Contents
Backup and Restore in SharePoint 2013. 2
Lab Objectives. 2
Audience. 2
Scenario. 2
Getting Started. 2
Connect to the Lab Environment 2
Exercise 1 – Backup and Restore a
SharePoint Farm.. 3
Scenario. 3
Task 1 – Configure Backup Settings. 3
Task 2 – Perform a Farm Backup. 4
Task 3 – Restore from a Backup [do
not execute this task] 7
Exercise 2 – Migrate Site
Collections, Sites, and Lists. 7
Scenario. 7
Task 1 – Perform a Site Collection
Backup. 8
Task 2 – Export Sites and Lists. 9
Task 3 – Recover Data from Unattached
Content Databases. 10
Exercise 3 – Backup and Restore with
Windows PowerShell 12
Scenario. 12
Task 1 – Restore Site Collections. 12
Task 2 – Import Sites and Lists. 13
Task 3 – View Backup History. 15
Summary. 16
Estimated time to complete this lab: 45 minutes
The objective of this HOL is to introduce you to the backup
and restore features in SharePoint 2013.
After completing this lab, you
will be better able to:
·
Use farm-level backup and restore features of SharePoint 2013.
·
Use granular backup and content recovery tools in SharePoint
2013.
·
Use Windows PowerShell to restore sites and lists in SharePoint
2013.
·
SharePoint Administrators and SharePoint IT Professionals
SharePoint 2013 offers similar backup
and restore functionality to SharePoint 2010. Farm-level backup and restore has
been extended to provide more flexibility, and you can now backup individual
site collections and export sites or lists from a single, central location. You
can now also manage and script all aspects of the backup and restore process by
using Windows PowerShell. This lab provides an overview of the functionality in
each of these features.
Log on to the SharePoint
(SPAF) Virtual Machine (VM) as Administrator with the following credentials:
Username: CONTOSO\Administrator
Password: pass@word1
SharePoint 2013 includes a sophisticated farm-level
backup and restore feature set. The feature set provides fine-grained control
over which farm components you want to back up or restore. This flexibility can
help you to perform a variety of tasks, from planning for disaster recovery to
migrating farm-level configuration or components across server farms. In this
exercise, you will explore the backup and restore feature set through the
Central Administration user interface.
Estimated time to complete this exercise: 15 minutes
In this exercise, you will learn how to backup and restore a
SharePoint farm using Central Administration.
In this task, you will create a
network share and configure the Central Administration settings for farm-level
backups.
1. Open
a command window (Start, Command Prompt) and browse to the C:\
directory. To do this, type the following command and press ENTER:
cd /
2. Create
a backup folder. To do this, type the following command, and then press ENTER:
mkdir SPBackup
3. Give
the SharePoint Timer service account and the Microsoft SQL Server service
account Full Control permission on the backup folder. To do this, type the
following command, and then press ENTER:
Cacls SPBackup /G CONTOSO\Administrator:F
Note: In this case,
the SharePoint timer service and the SQL Server service both run as administrative
accounts for each service.
4. At
the Are you sure prompt, type y and then press ENTER.
5. Create
a file share for the backup folder, and give the CONTOSO\Administrator account
Full Control permissions on the file share. To do this, type the following
command, and then press ENTER:
Net Share SPBackup=C:\SPBackup /GRANT:CONTOSO\Adminstrator,FULL
Log on to the SharePoint
(SP) virtual machine as Administrator with the following credentials:
Username: CONTOSO\Administrator
Password: pass@word1
1. Launch
Central Administration Web site. To do this, click Start, All
Programs, Microsoft SharePoint 2013 Products, and SharePoint 2013
Central Administration.
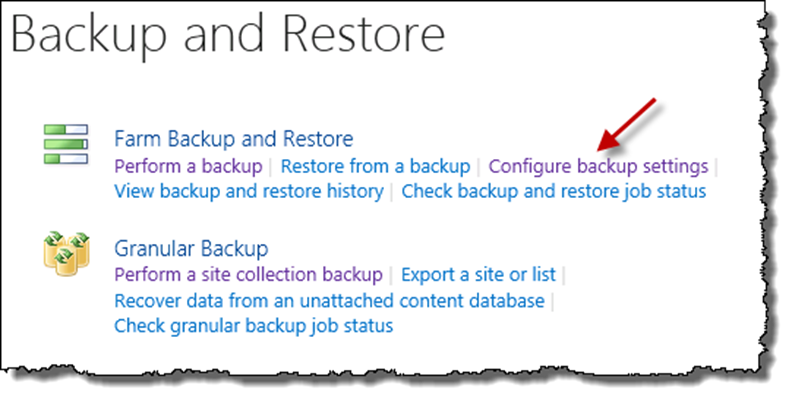
2. On
the Central Administration home page, click the Backup and Restore
heading.
3.
On the Backup and Restore page, under Farm Backup and
Restore, Click Configure backup Settings.
4. In
the Backup location textbox, type \\W15-SP-AFCACHE\SPBackup, and then
click OK.
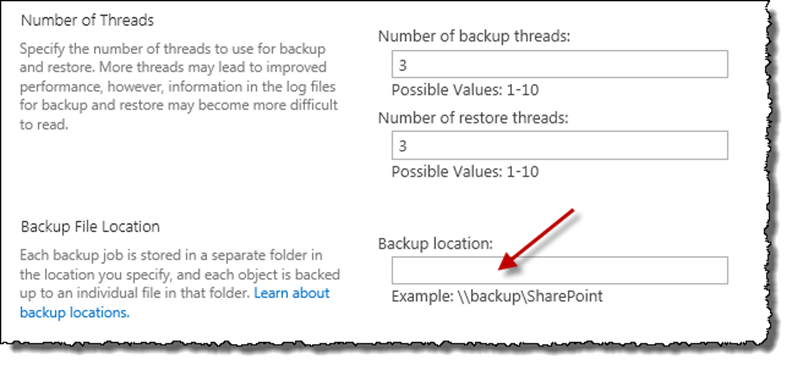
Note: you can
specify the number of threads. Three is the default value. You can increase the
number of threads to reduce the time it takes to back up or restore your
environment, but this can make the log files less coherent as more operations
occur simultaneously.
Backing up both the content and configuration settings will
take longer than the allotted period for the HOL. In this task, you will back
up the Farm Configuration settings only.
In this task, you will use Central Administration to perform
a farm configuration backup.
1. On
the Backup and Restore page, click Perform a backup.
Note: you have
an extremely granular level of control over which farm components you want to
backup, including deployed solutions, individual services, and people.
2. Check
the Farm check box, and then click Next. You will then see the
following page.
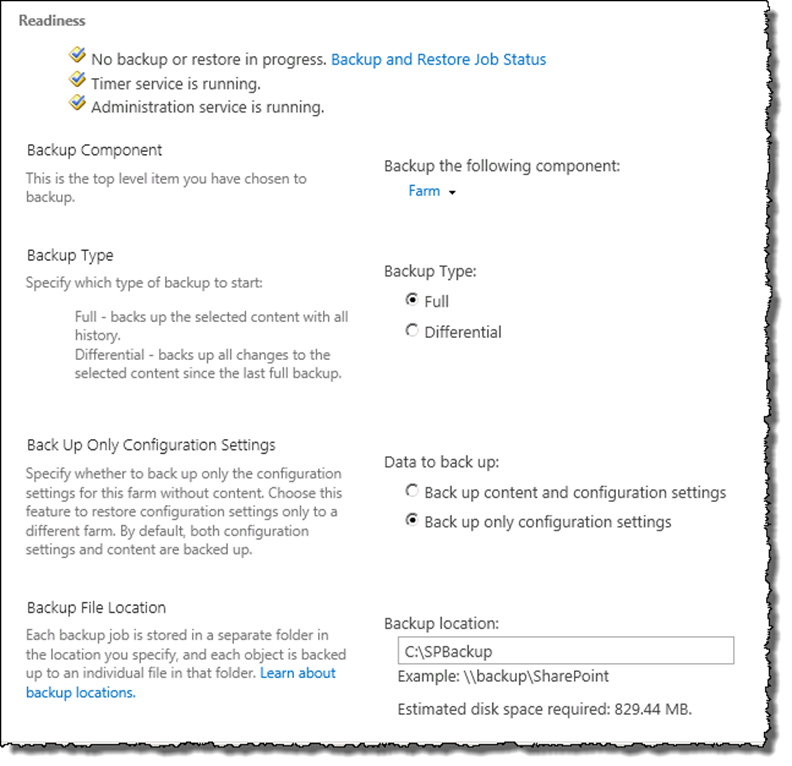
Take a
moment to review the options on this page.
·
You can choose whether to perform a
full backup or a differential backup. As this is the first time you have backed
up this server farm, you must perform a full backup.
·
You can choose whether to back up
content and configuration settings, or only configuration settings. The Back
up only configuration settings option is useful when you want to replicate
your configuration settings to another deployment, such as a test environment.
3. Select
Back up only Configuration settings. (Note: Backing up content and
configuration settings will take longer than the allotted time for this HOL.)
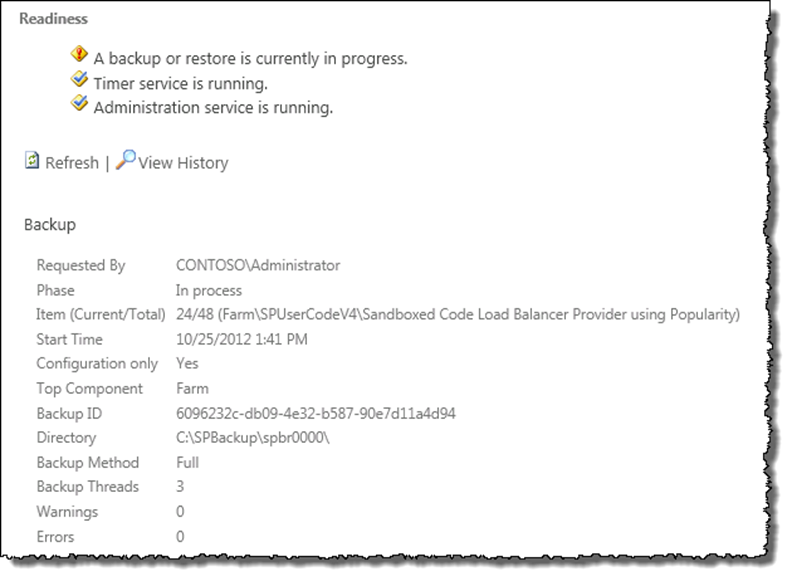
4. Scroll to the bottom of the page and click Start Backup
The Backup and Restore Job
Status page automatically refreshes periodically to report on the progress
of the backup job.
5. Use
Windows Explorer to open the C:\SPBackup folder on the SPAF machine (\\W15-SP-AFCACHE\SPBackup
if opening from SP machine) and examine its contents.
·
The spbr0000 folder contains the
actual backup data. Each backup is created in a distinct folder. This folder
also contains a log file for the backup and log files for any subsequent
restores from this backup.
·
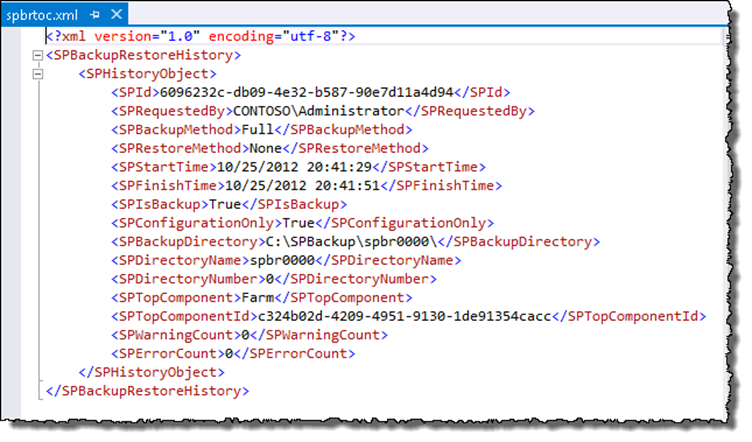
The spbrtoc.xml file stores
metadata on each backup. The metadata in this file provides the information you
see on the Backup and Restore Job Status page. Every new backup creates a new SPHistoryObject
element in the file. Double click the spbrtoc.xml to open it in Internet
Explorer.
6. Open
the spbr0000 folder.
Note:
the files named spbackup.log and spbackup.xml contain a detailed
log of the backup process in text format and xml format respectively.
Executing this task will take longer than the allotted
period for the HOL. It is not meant to be completed; however, it has been
documented because it is important that you understand the procedure involved.
In this task, you will simulate a database failure and
restore the content database from a backup.
1. On the SP machine, in the Central Administration Web site,
on the Backup and Restore page, click Restore from a backup
2. Select the backup to restore (there should only be one),
and then click Next.
3. Under Select component to restore, select Microsoft
SharePoint Foundation Web Application and then click Next.
4. Under Restore Options, select Same configuration.
5. Click Start Restore.
6. Close all open windows.
Note: You can view
a history of backup and restore operations at any time through the Central
Administration Web site. To do this, on the Backup and Restore page, click View
backup and restore history.
In this exercise, you learned about
different options available in a Farm backup and restore.
Exercise 2 – Migrate Site Collections, Sites,
and Lists
Estimated time to complete this exercise: 15 minutes
In addition to the farm-level backup and restore feature
set, SharePoint 2013 includes tools that you can use to back up, export, or
recover individual site collections, sites, and lists. Generally speaking,
these tools are targeted more at migration operations, such moving a site or a
list between Web applications, rather than at pure disaster recovery scenarios.
However, one particularly useful new addition to SharePoint 2013 enables you to
browse and recover data from an unattached content database.
In this exercise, you will
explore the granular backup and restore features.
·
You will back up a site collection (http://intranet.contoso.com/Sites/NewTeam),
and restore it to http://it.contoso.com/sites/NewTeam.
·
You will back up a list:(http://intranet.contoso.com/sites/contoso/lists/announcements)
and restore it to http://it.contoso.com/sites/NewTeam.
·
You will export a list (http://intranet.contoso.com/sites/contoso/lists/links)
from an unattached database and restore it to http://it.contoso.com/sites/newteam.
Task 1 – Perform a
Site Collection Backup
In this task, you will use the
Central Administration user interface to back up an individual site collection.
Note that you will be using the intranet.contoso.com Web Application.
1. On the SP machine, open a browser window and browse to http://intranet.contoso.com/Sites/NewTeam.
Familiarize yourself
with the content of the site collection. You will migrate the entire site
collection, including images, lists, and custom content, to the Web application
on port 80.
2. Close the browser window and launch the Central
Administration Web site.
3. On the Central Administration home page, click the Backup
and Restore heading.
4. On the Backup and Restore page, under Granular
Backup, click Perform a site collection backup.
5. On the Site Collection dropdown menu, select Change
Site Collection.
6. On
the Select Site Collection dialog, ensure that the Web Application
is set to http://intranet.contoso.com/. To change the Web Application,
do the following:
a.
On the Web application dropdown menu, select Change Web
Application.
b.
Click intranet.contoso.com.
7. On the Select Site Collection dialog, select the /sites/NewTeam
site collection, and then click OK.
·
If the site collection is not displayed, perform a search by
typing /sites/newteam in the search box and press Enter.
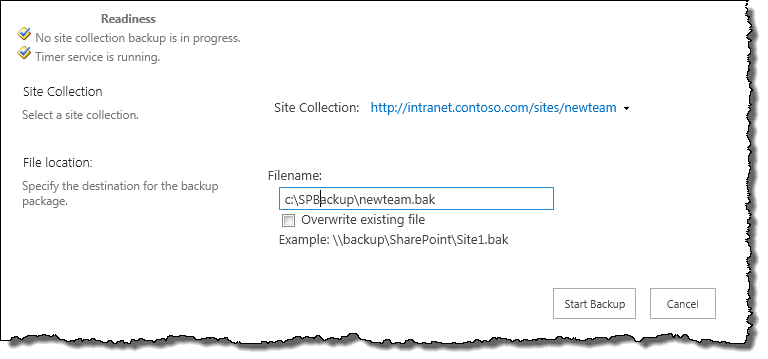
8. In the Filename textbox, type \\W15-SP-AFCACHE\SPBackup\newteam.bak, and then
click Start Backup.
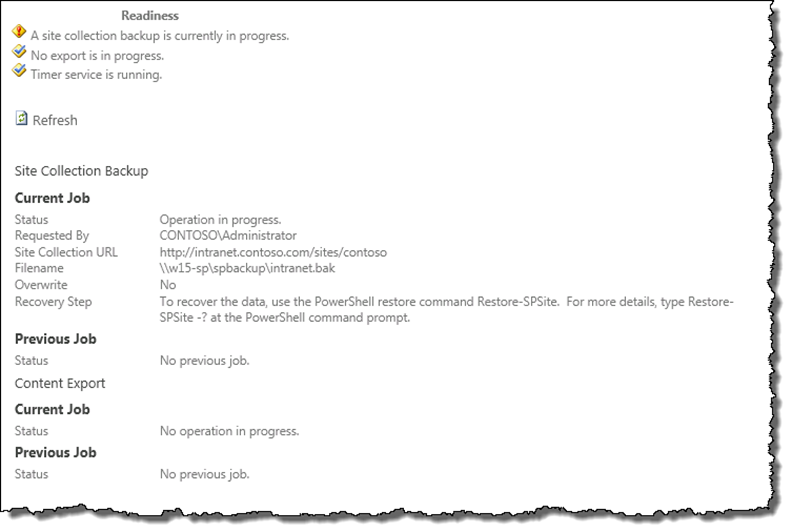
The
Granular Backup Job Status page automatically refreshes periodically to report
on the progress of the site collection backup.
9. Go back to the Backup and Restore page.
Note: the Central
Administration user interface does not provide any options for restoring a site
collection from a backup. You will use the SharePoint 2013 Management Shell to
restore the site collection later in this lab.
In addition to creating backups of
site collections, you can also export individual sites and lists. Exporting and
importing sites and lists are common tasks in many scenarios. For example,
these are particularly useful in large Web content management deployments,
where you will often maintain separate environments for authoring, staging, and
live content. In this task, you will use the Central Administration user
interface to export an individual list.
1.
On the Backup and Restore page, under Granular Backup, Click Export
a site or list.
2.
In the Site Collection section, ensure http://intranet.contoso.com/sites/Contoso
is selected. If you need to change it do the following:
a. Select Change
site Collection from the dropdown menu, to get the Select Site Collection
dialog.
b. Ensure
that Web Application is set to http://intranet.contoso.com, otherwise,
select Change Web Application from the dropdown. On the Select Web
Application dialog, select the intranet.contoso.com web app.
c. Returning
to the Select Site Collection dialog, select /sites/Contoso then press
OK.
3.
In the Site dropdown menu, ensure /sites/Contoso is
selected. If you need to select it, do the following:
a. Select Change
Site from the dropdown.
b. Select /sites/contoso
and click OK.
4.
In the List dropdown menu, ensure Announcements is
selected. If you need to select it, do the following:
a. Select Change
List from the dropdown.
b. Select Announcements
and click OK.
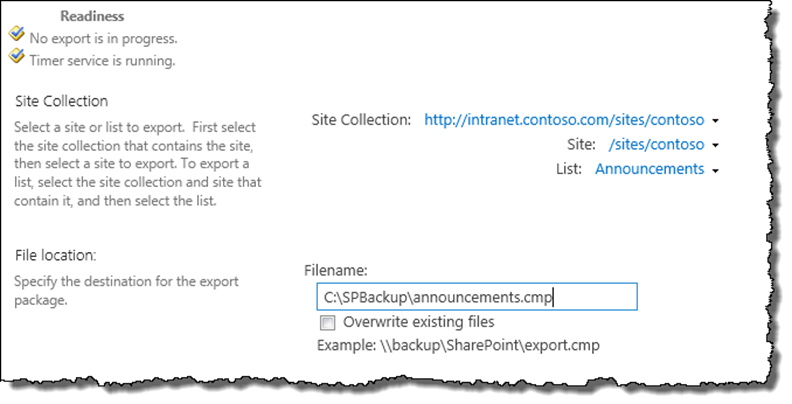
5.
In the Filename text box, type \\W15-SP-AFCACHE\SPBackup\Announcements.cmp,
and then click Start Export.
6.
Go back to the Central Administration home page.
Just as
you cannot use the Central Administration user interface to restore an
individual site collection, you cannot import individual sites or lists.
Instead, the SharePoint 2013 Management Shell provides tools for tasks of this
nature. You will use the SharePoint 2013 Management Shell to import this list
later in this lab.
In some scenarios, it can be
useful to recover sites and lists from an unattached content database without
going through the more laborious process of reattaching the database to a Web
application. In this task, you will remove a content database from the server
farm and then use the recovery tool to extract a list from this database.
1.
On the Central Administration home page, under Application
Management, click Manage content databases.
2.
In the Web application dropdown menu, ensure http://intranet.contoso.com/
is selected.
3.
The table contains several entries you will be using the following
content database: WSS_Content_aefd7f9706154c318b93a0ac46b26256
4.
Click on the database name.
5.
On the Manage Content Database Settings page, scroll down
and select Remove content database, and then click OK.
Note: This
disconnects the database from the SharePoint farm. It does not delete the
actual database file.
6.
On the left navigation panel, click Backup and Restore.
7.
Under Granular Backup, click Recover data from an
unattached content database.
8.
In the Database Name text box, type the database name you
noted down in step 3, and then click Next.
9.
Note: You do not have to type the database
name in this environment. Simply click and drag to select the content database
name in step 3 above, right-click the selection and click Copy. In the Database
Name field in the lab, right-click and click Paste.
10.
In the Site Collection section, select the following
values:
· Site
Collection: http://w15-sp:2013/sites/Contoso
· Site: /sites/Contoso
· List: Links
(If Links does not appear, type Links in the search box and press Enter).
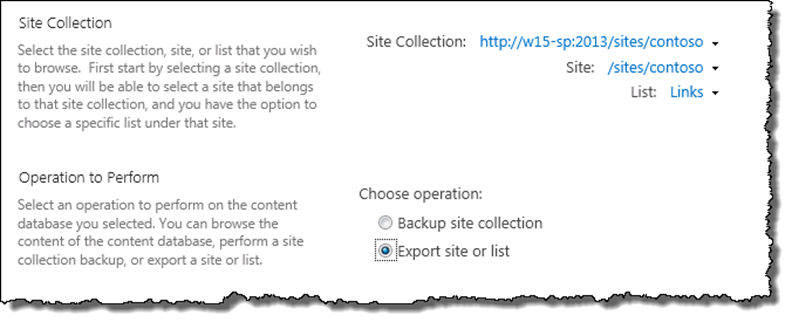
11.
In the Operation to Perform section, select Export site
or list, and then click Next.
At this point, you should find yourself
on the Site Or List Export page that you encountered in the previous
task, even though the content database is no longer attached to SharePoint 2013.
12.
In the Filename text box, type \\W15-SP-AFCACHE\SPBackup\Links.cmp,
and then click Start Export.
In this exercise you learned
about granular backups. In particular:
· A
Site Collection backup
· Exporting
a list
· Recovering
data from an unattached database
Estimated time to complete this exercise: 15 minutes
The SharePoint snap-in for the Windows PowerShell
scripting language provides access to all the backup and restore functionality
that you have seen in the Central Administration user interface and much more.
The SharePoint 2013 Management Shell is a Windows PowerShell command window
with the SharePoint snap-in preloaded. Through the Management Shell, you can
back up and restore an entire server farm, a configuration database, or an
individual site collection, and you can import and export sites and lists with
granular control over permissions and versioning.
In this exercise, you will focus
on the tasks for which you must use Windows PowerShell cmdlets, namely
restoring individual site collections and importing sites and lists. You will
also explore the backup history of your server farm through the Management Shell.
In this task, you will restore a
site collection to a different Web application. You will use the site
collection backup that you created in Exercise 2 as the source file.
1. On the
SPAF machine, open the SharePoint 2013 Management Shell. To do this, on the Start
menu, point to All Programs, Microsoft SharePoint 2013 Products,
and then click SharePoint 2013 Management Shell.
2. At the PS
> prompt, type the following command, and then press ENTER.
Get-Help Restore-SPSite -detailed
Take a moment to study the syntax of the Restore-SPSite
cmdlet. In this lab, you will use the Identity parameter to specify
where to create the restored site and the Path parameter to specify the
location of the backup file.
3. At the PS
> prompt, type the following command, and then press ENTER.
Restore-SPSite –Identity http://it.contoso.com/sites/newteam
-Path \\W15-SP-AFCACHE\SPBackup\newteam.bak -Force
Note: You do
not have to type the command name. Simply click and drag to select the command
above, right-click the selection and click Copy. In the SharePoint
2013 Management Shell window, right-click the window’s title bar and click Edit,
Paste.
4. At the
confirmation prompt, type Y and then press ENTER.
5. When
command completes, open a browser window and browse to http://it.contoso.com/sites/newteam.
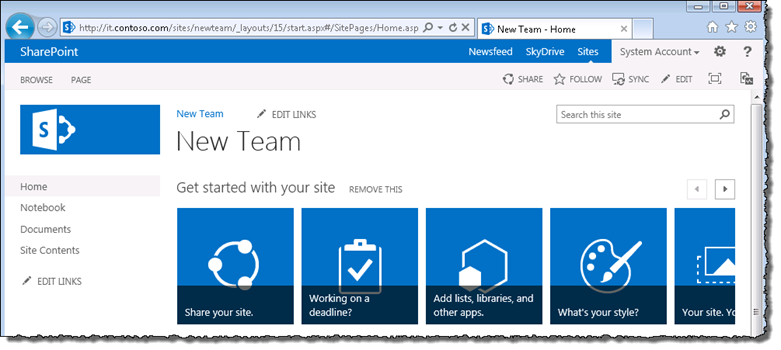
6. Verify
that all site content has restored correctly to the new URL.
7. Close the
browser window.
In this task, you will import
custom lists to an existing site. To do this, you will use the list exports
that you created in Exercise 2 as source files.
1. In
the SharePoint 2013 Management Shell, at the PS > prompt, type the
following command, and then press ENTER.
Get-Help Import-SPWeb -detailed
Take a moment to
review the syntax of the Import-SPWeb cmdlet. Note that you can use this
cmdlet to import site collections, lists, and libraries in addition to SPWeb
objects. You can specify whether you want to import security settings, if these
were included in the export, and whether you should overwrite existing versions
where applicable.
2. At the PS > prompt, type the following command,
and then press ENTER.
Import-SPWeb –Identity http://it.contoso.com/sites/newteam -Path
\\W15-SP-AFCACHE\SPBackup\Links.cmp
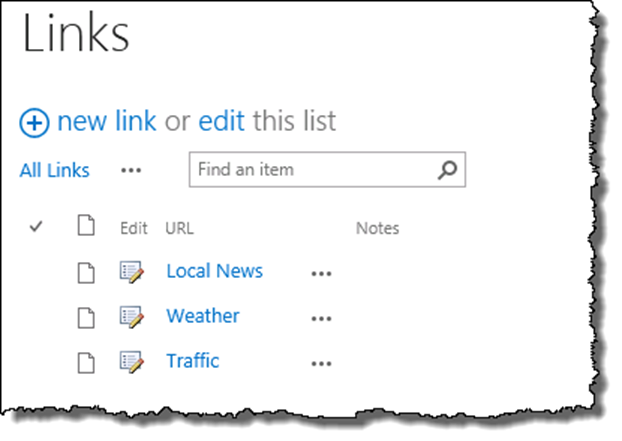
3. Open a browser window and browse to http://it.contoso.com/sites/newteam.
4. Notice that a Links link has been added to the Quick
Launch in the left navigation panel.
5. Click the Links link, and verify that the list
contents have been added correctly.
You will now repeat
this process for the Announcements list. Remember that whereas you exported the
Announcements list from a live site, you extracted the Links list from an
unattached content database. It is important to note that you can import the
list in exactly the same way.
6. In the SharePoint 2013 Management Shell, at the PS >
prompt, type the following command, and then press ENTER.
Import-SPWeb –Identity http://it.contoso.com/sites/newteam -Path
\\W15-SP-AFCACHE\SPBackup\Announcements.cmp
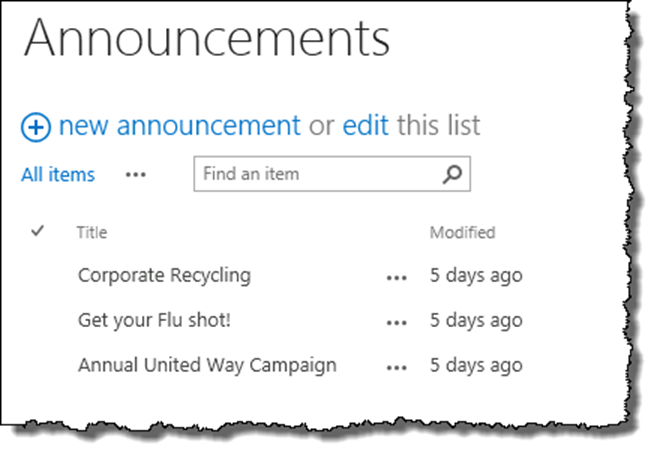
7. In the browser window, refresh or browse to http://it.contoso.com/sites/newteam.
8. Notice that an Announcements link has been added to
the Quick Launch in the left navigation panel.
9. Click the Announcements link, and verify that the
list contents have been added correctly.
10. Close the browser window.
In this task, you will use the Management
Console to explore the backup and restore history of your server farm.
1.
In the SharePoint 2013 Management Shell, at the PS >
prompt, type the following command, and then press ENTER.
Get-Help Get-SPBackupHistory -detailed
Take a moment to study
the syntax of the Get-SPBackupHistory cmdlet. You can use this cmdlet to view a
summary of all your farm-level backup and restore operations at a glance. You
can also restrict the results to show only backup operations or only restore
operations by using the ShowBackup or ShowRestore switch parameters.
Note: The
Get-SPBackupHistory cmdlet will only show a history of farm backup and restore
operations. Site collection backups and site or list exports are not included.
2.
Type the following command, and then press ENTER.
Get-SPBackupHistory –Directory \\W15-SP-AFCACHE\SPBackup
3.
The cmdlet returns a summary of all backup and restore operations
to and from the \\W15-SP-AFCACHE\SPBackup network share.
4.
Type the following command, and then press ENTER.
Get-SPBackupHistory –Directory \\W15-SP-AFCACHE\SPBackup
-ShowBackup
5.
The cmdlet returns a summary of all backup operations to and from
the \\W15-SP-AFCACHE\SPBackup network share. Restore operations are excluded.
6.
Type the following command, and then press ENTER. (Note: A
restore was not performed as part of this lab. The command will not return any
information.)
Get-SPBackupHistory –Directory \\W15-SP-AFCACHE\SPBackup
-ShowRestore
7.
The cmdlet returns a summary of all restore operations to and
from the \\W15-SP-AFCACHE\SPBackup network share. Backup operations are
excluded.
In this exercise, you learned about restoring content using
PowerShell. In particular:
· Restoring
a site collection
· Restoring
a list that were backed up using granular backup
· Restoring
a list from that was recovered from an unattached database
In addition, you also learn about
PowerShell commands that allow you to view backup history information.
This lab provided an overview of
the backup and restore features in SharePoint 2013. In particular, the lab
explored:
· Farm-level
backup and restore features for disaster recovery and configuration migration.
· Granular
backup and restore tools for content migration and data recovery.
· The
role of Windows PowerShell and the SharePoint 2013 Management Shell in backup
and restore operations.